Showing posts with label Tips. Show all posts

March 2, 2010

Resources For Zazzlers

Sometimes we may need help coming up with design ideas or even design elements. Here is a resource list or at least the beginning of one. I tend to be a little unorganized. Check back often.

Image Editing Software

Free

Gimp
The GNU Image Manipulation Program for raster/pixel based images. Free and Open Source :). My program of choice.

Inkscape
An Open Source vector graphics editor, with capabilities similar to Illustrator, CorelDraw, or Xara X, using the W3C standard Scalable Vector Graphics (SVG) file format. I also use this one quite a bit.

Not Free

Adobe Photoshop
A pixel-based graphics editing program developed and published by Adobe Systems.

Multiple Resource Sites

Media Militia
All kinds of cool stuff here. Freebies, Tutorials, and Inspirations. Also a trippy nav bar that makes you feel like you're playing Pong :).

Bitbox
Lots of cool Freebies. Also great tips and tutorials. For the tuts look for the tag cloud on the right side of the page about a third of the way down.

Naldz Graphics
Tutorials, Freebies, and awesome Inspirations.

Gimp and Photoshop Brushes

Obsidian Dawn

rl-Brushes

Stock Photos, Textures, and Public Domain Images

Not all images found on these sites are released for commercial use so check first.

Photos8
Free photos and desktop wallpapers. Huge easy to search collection of High resolution photos and wallpapers, thousands of high quality pictures.

Karen's Whimsy
A large collection of pre 1923 images now in the Public Domain. Karen has spent considerable amounts of time searching for and buying the source material, scanning, fixing, and editing the images, and then putting them on the web. She has also prepared a huge artist resource list. Rather than hijack her work I share with you her link to artist resources. After browsing the list it looks like there's no point in me finishing mine smiley. Still I'll continue which means you may see duplicates.

Lost And Taken
Tons of Textures. Free and premium.

EveryStockPhoto
I mainly search Morguefile here using the advancedsearch. It seems faster to me than going directly to Morguefiles site.

CG Textures
This one requires an account to download textures. You can get a free account but it will only let you download up to 15mb each day. If you go for the large textures you can eat up that 15mb with just 3 or 4 textures :).

Texture King
Please don't let the fact that they sell a t-shirt on CP for support throw you off :).

The Vector Lab
Premium vector stock art.

VectorStock
Must get an Expanded License to use these vectors on products.

February 28, 2010

Zazzle Tutorial- Add Merch Store to Facebook Page Sidebar

Edit: Since Facebook removed Boxes from Pages it looks like the Merch Store can only be added as a tab now.

Many Zazzle shop keepers have set up a business page on Facebook. Getting the the page is easy enough but sometimes adding things to it can be frustrating. For many the Merch Store has caused a lot of headaches. The instructions are simple enough. Visit the Merch Store page then click Add To My Page on the left sidebar. After that you go to your page expecting to see the Merch Store there. Where is it! Look for your Boxes tab and click on it. It's in there but most likely only as text. After messing with this for a couple of hours and reading different instruction I got mine working last night. Here is how to do it. Warning! You will be deleting your Boxes Tab to do this.

Lets start from the beginning.
  • Visit the Merch Store page
  • Click Add To My Page found on the left sidebar
  • Pick from the pop up the page you wish to add it to
  • Click Go To Application
  • Click Add Products or click Settings located near top of page
  • On the settings page you will see Add designers from Zazzle and below that is Zazzle Username with a form box under it. Enter your Zazzle Username there then click Add to merch store
  • Go to the Facebook page you are adding the store to and find your Boxes Tab. If you have many tabs it may be hidden. If so click the double arrows to show it then click Boxes.
  • Here's the scary part. For anything listed other than Merch store you will have to delete them. Do this by hovering your mouse near the top right corner of each listing until you see the little Pencil icon and click it then choose Delete or Move To Wall Tab.
  • Once all that is left is Merch Store bring up it's Pencil icon and choose Move to wall tab. You may have to refresh your page to see it and it may be the last item in your sidebar.
Now that you have it you may not be impressed. There will only be 4 products shown. However, if the customer clicks the username shown they will be taken to another page with more products. If you are still having problems adding you merch store just let me know and I'll try to help you.

November 15, 2009

Tip before using Zazzle guide files

Pixels per inch of Zazzle guide files

Have you downloaded Zazzle guide files? If you are used to Cafepress these are the same as product templates. Depending on which format you download you may want to edit before using. I noticed that the psd files are already at a good dpi/ppi (dots per inch / pixels per inch). The png files however aren not. The ones I have looked at are only 72ppi.


This I found out the hard way. Being used to CP I opened the file in Gimp and made my image. I put he image on several products. It was days later that I found out thay were only 72ppi images. Not good for quality printing. Of course the image had to be remade and products removed and replaced. Yippee!


The easy fix for this is to just use the PSD files. If your image editor will open them. PSD is Photoshop document. Gimp can open PSD files. I can't remember which version this was implemented. You should be safe with newer versions.


The not so easy fix is to create new files lik I did. Why did I do that? My resulting file sizes are much smaller. Since I have an old slow computer this was a big help when running Gimp. For example Zazzle's button psd is a little over 900KB. My file is a little over 100KB. That's just for the button. For the larger images you will see a bigger difference.

Edit guide file in Gimp for higher PPI

It is not hard to edit guide files in Gimp. If you use Photoshop this should be a bout the same process. Create a new image with the same dimensions as the one you will be editing but at 200ppi. For example the button guide file is 1200 x 1200. Now open the guide file as a new layer. Make sure it is the toplayer. Delete the blank bottom layer. Now just save the file with the name of the one you are replacing. You will get the message that a file by that name already exist. Choose to replace it. Now you have a png file that isn't a terrible 72dpi/ppi and at a much lower file size than the PSD files.

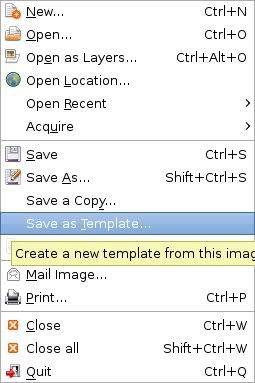
Gimp save as template Ok I'm getting forgetful. To make this even better use Save As Template. This is an option in Gimp but not sure about Photoshop or others. Do this with all your guide files/templates. After that when you create a new document in Gimp you can pick from Templates. If this has been any help to you please let me know.